Saturday 29 December 2012

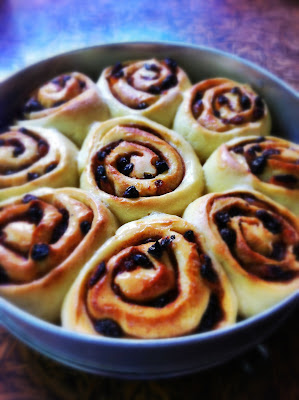
Chelsea Buns

I hope you all had a wonderful Christmas and have recovered from all the excessive eating and drinking. Yes, Christmas is done, but at my home, season's eatings continues... with these lovely Chelsea buns.  I did some history research before baking these buns and found out that the buns go way back to the early 18th century; gaining its name from a bakery, the Bun House, in Chelsea area in London.  So, it's not associated with the football club as some friends suspected. 

I used a mixture of raisins and golden raisins for the filling here. But, had I some currants and dried cranberries, I would have thrown them to the mixture as well. Some lemon or orange zest would definitely add to the flavour as well. 

Serve them warm with soft butter, or if you're like me, some vanilla and lemon curd... heavenly. 


Chelsea Buns
Recipe from The Great British Bake Off
For the list of ingredients and instructions, click here.

I am quite glad that 2012  is soon coming to an end. This year has not exactly gone to plan, and it sucks! But  someday I know I will appreciate all that happened. In the meantime, I will be patient, continue learning and seize every opportunity along the way...  

I also want to take this moment to thank all of you wonderful readers and friends from all parts of the world, for reading, commenting, blogging, tweeting and sharing your stories with me. I wish you a very happy new year! Have a great one my friends...

Tuesday 18 December 2012

Cheese, Corn and Kaffir Lime Leaves Crisps

With time on my hands right now, I have been spending my time experimenting in the kitchen... discovering, testing and stealing recipes from mom's recipe scrap book... it's like opening a treasure box and finding so many charming, old-fashioned recipes.  Many of which I remember eating as a kid.  I can feel some of the cakes will make a comeback very soon... so watch this space :)

One of the recipes I discovered is for a home-made crisps that are flavoured with cheese and corn.  It is very good and it's only right that I share it with all of you.  The original recipe uses curly-leaf parsley (you can probably guess that this is in the '80s territory).  I did try it with parsley first time round, but it just didn't do it for me.  It does give a nice colour, but contribute very little in terms of flavour. 

After some discussion, mom and I then opted for kaffir lime leaves... and I think we made a great decision here.  It is intensely fragrant with a distinctive citrus scent.  You will need to go to your local Asian store to get them, but it is definitely worth it.

Making the dough for the crisps is exactly the same as making a pasta dough.  Mom has a pasta machine which makes it very easy.  But making it in the traditional way isn't difficult. Therapeutic in fact... well, for me anyway.  Or you can also make the dough in a food processor. Once the dough is made, you can shape the crisps any way you want.  This time, they look like rigatoni pasta.  

You may notice the beef bouillon in the recipe which you can replace with the vegetable kind to make these crisps vegetarian friendly. I wouldn't leave it out completely though, as you wouldn't get the savoury saltiness, which makes the crisps so addictive. These crisps didn't last very long in our house, that I can tell you :)


Cheese, Corn and Kaffir Lime Leaves Crisps

500 gr tapioca flour/starch
100 gr finely grated mild cheddar cheese
2 teaspoons beef bouillon, crushed
1 teaspoon salt
150 gr fresh corn kernels
1 egg + 1 yolk
2 tablespoons kaffir lime leaves, finely cut 

Start by making a purée by blending the corn kernels, egg, yolk and salt in a blender.

Now, if you have a pasta machine, combine all the ingredients and simple mix until it becomes a dough.  If you are using a food processor, again, combine all the ingredients and pulse until everything is combined.  Then take it out from the processor to your work surface.  At first, the mixture may seem wet, but as you work it with your hand, it will come together as one nice lump. 

If you are making this the traditional way, combine the flour, cheese, crushed bouillon and kaffir lime leaves in a bowl or a work surface.  Make a well in the centre and add the eggy corn purée.  Using the tips of your fingers, mix the eggy mixture with the flour, incorporating a little at a time, until all is combined.  Knead the dough until it is smooth.

Roll the dough as you would make fresh lasagne sheets and cut it in any shapes you want.... strips, triangles, stars, etc...

Heat some vegetable oil in a pan and fry the crisps for a few minutes until they are golden.  Take them out and place on some kitchen towels to absorb the excess oil.  Wait until they are completely cool before storing in an airtight container.  They will keep for a few days, but I doubt they'll last that long...
Tuesday 11 December 2012

Cognac and Raisins Ice-Cream

This is supposed to be my favourite time of year... If I were back in the UK, I would be cooking hearty stews and casseroles, baking seasonal goods, inviting friends over for some mulled wine and home-made sweet mince pies, you know, the rest of the festivities.  Not that I cannot make stews or mulled wine here, but being in a tropical country where I am at the moment, it's just not the same... well, there's tropical thunderstorm every now and then, but that's not enough for me to crave a bowl of stew.  

People say nobody comes to England for the weather, but that's exactly one of the reasons I love England.... its gloomy weather.  Forget the sun, the white sandy beaches, coconut trees, etc... damn it, I want grey, cloudy, damp, snowy day!  Yes, I am feeling homesick.  I know It's a weird thing to say when I am at 'home', referring to the place where I was born...  Saying that, I haven't actually live here for over ten years and even though I am physically here, my heart is a few thousand miles away.  I look forward to coming back home, hopefully soon. 

Anyway, enough with my rant... now to this delectable cognac and raisins ice-cream.  I think this is my way of comforting myself with all those familiar flavours, but very much enjoyable in this hot climate.  But to be honest, I would still eat ice-cream even in the coldest winter's day.  Perhaps, I could also call this "sweet mince pie ice-cream" because that's exactly what it tastes like.  Utterly delicious. 

Making home-made ice cream is easy, especially if you have an ice-cream maker.  But like me, if you don't have an ice-cream machine, do not worry.  Just follow my simple instructions below.    


Cognac and Raisins Ice-Cream

50 g raisins
50 g golden raisins
100 ml cognac
4 yolks
80 g caster sugar
2 teaspoon ground cinnamon
2 teaspoon corn flour
seeds from 1 vanilla pod
450 ml milk
the zest of 1 orange 
300 ml double cream
toasted flaked almonds, for sprinkling (optional)

Start the night before by macerating the raisins and cognac in a bowl.  The next day, strain the plump and drunk raisins and set aside the leftover cognac for the custard.

To make the custard, bring the milk to a simmering point on a low heat.  In another bowl, whisk the yolks, sugar, vanilla seeds, ground cinnamon and corn flour until well blended.  Slowly pour the hot milk on to the yolk mixture, whisking all the time. 

Return this mixture to the pan and over a low heat, gently stir with a wooden spoon until thickened.  This might take ten minutes.  You know the custard is thick enough when you can draw a line on the back of the wooden spoon.  Take the custard off the heat and let it cool.  Add the reserved cognac and stir.  Cover the top of the custard to prevent skin forming.

When the custard is cold, start whipping the double cream and orange zest until it's firm but still soft.  Fold in the cold custard.  Now, if you have an ice-cream maker, simply put this mixture in it and churn away... Otherwise, put the custard mixture in a container and then to the freezer.  Every hour or so, take the ice-cream out and whisk.  This is necessary so that you won't get ice crystals and to ensure the ice cream is smooth.  Do this two or three times and then let the ice-cream freeze completely.

Scoop the ice-cream into a bowl and sprinkle with some toasted flaked almonds if you wish, or some crushed amaretti biscuits will be nice too.

This ice-cream is also my first entry for the Bloggers Scream For Ice Cream by Kavey Eats.  The theme this month is boozy ice-cream (two of my favourite things combined into one)... so if you're making boozy ice-cream this holiday season, do take part in the challenge...


Thursday 6 December 2012

Lemon and Vanilla Buttermilk Cake

I've been experimenting with lemony cakes and after several tests, I feel I must share with you the recipe for this lemon and vanilla buttermilk cake, because it is utterly delicious.  I love the combination of lemon and vanilla.  They are among my favourite flavours of all time.  I always add vanilla seeds when making lemon curds.  They simply compliment each other.  

This is a very easy cake to make.  And of course, if you don't have buttermilk, natural plain yoghurt will do the job just fine.  Or you can always make buttermilk substitution by adding a tablespoon of lemon juice to a cup (250 ml) of milk.  Just give it a stir and let it stand for ten minutes or so until it thickens.  Easy, right?

In essence, this cake is actually a lemon drizzle cake.  Not only you get the lemon flavour in the cake from the zest, but also as the cake is out from the oven, it is then drenched with a lemon syrup... making this cake  incredibly moist. 

I must apologise that if you are going to comment on this post, I have put the annoying word verification back on again as today.  I received so many random anonymous comments and they're just beyond ridiculous now.  Just this morning, I got over seventy spam comments.  If anyone have any tips or suggestions on how to stop this, please let me know.  Thank you in advance. 


Lemon and Vanilla Buttermilk Cake 

3 eggs, free-range or organic
200 gr caster sugar
150 gr buttermilk
250 gr cake flour (or use 175 gr plain flour + 75 gr corn flour)
1 1/2 teaspoons baking powder
a pinch of salt
Finely grated zest of 2 lemons
1 teaspoon of vanilla paste (or the seeds of a vanilla pod)
150 ml vegetable oil
Icing sugar, for dusting

For the lemon syrup
the juice of 2 lemons
50 gr caster sugar

Preheat the oven to 180 C.  I use a 23 cm bundt tin for aesthetic purpose, but there's no need to.  You can use a regular 23 cm round tin.  Grease and flour or line the tin of your choice.

In a bowl, sift the flour, baking powder and salt.  In another bowl, whisk the eggs, sugar, buttermilk, lemon zest and vanilla.  Add the dry ingredients to the wet and mix well.  With a spatula, slowly fold in the vegetable oil until all is incorporated to the batter.

Pour the batter into the tin and bake for 35 - 40 minutes or until a wooden skewer comes out clean when poked to the centre of the cake.

Make the syrup by cooking the lemon juice and sugar in a small pan.  Heat gently until the sugar has dissolved and until it thickens.

When the cake is out from the oven, using a wooden skewer, make lots of little holes all around the cake.  Drizzle the syrup all over the cake.  It's best to do this when the cake is still warm as the cake will absorb the syrup better.  Let the cake cool in the tin.  When ready to serve, take it out from the tin, to the serving platter, and dust with icing sugar.